One of the most shocking moments for you could be the bathroom disaster and seeing it flooded with water. It happens when the toilet shut-off valve won’t shut off properly. It happens during home improvement and toilet reinstallation.
The water shut-off valve may stop working for various reasons, including damage in the threading and the problem in the shut-off valve itself. Thankfully, you can solve this bathroom disaster without the help of a professional plumber.
Yes, when you see the shut-off valve not working, turn off the water supply line immediately and inspect for the potential issue. Once you find the real issue, you can start fixing it. We will show you the fixing steps in the dedicated section.
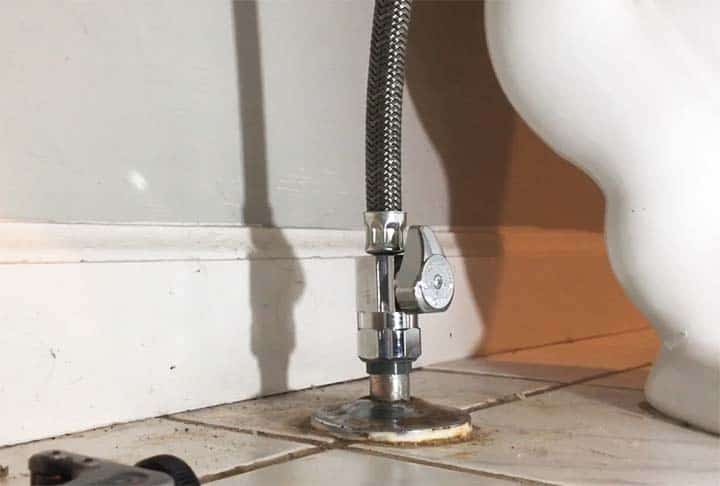
Toilet Shut off Valve Won’t Shut Off: The Reasons
When the shut-off valve of the toilet stops working, it could be dangerous, causing severe malfunction in the bathroom. Thus, you must first find the reasons of the shut-off valve won’t shut off to fix the problem immediately.
- At times, the shut off valve may get stuck, so stop the valve from shutting off accurately. It might happen due to grime and residue accumulation. The good thing is you can quickly fix it with lubrication only. You can use WD40 lubricating oil to remove the stuck and allow the shut off valve to work properly.
- You may also experience turning the shut-off valve, but it is stopping only partially. It yields a partial shut off of the valve, and the water will still drip through it. When the shut off valve closes partially, you may need to replace the valve to fix the problem.
- Finally, you may find water leaking from the tap even after shutting off the valve correctly. It happens when the shut off valve gets loose due to overuse for years. You need to tighten the shut off valve properly to fix the problem. If tightening the shut off valve doesn’t work, you need to replace the washer.
When you experience these shut-off valve problems, you need to fix them quickly. Or else, you will see the bathroom flooding soon, ruining your entire day.
Replace the Shut off Valve:
One of the main reasons for the shut-off valve not shutting off is a damaged valve. Thus, you need to replace it.
Step 1: Stop the Water Supply Line
You must turn off the main water supply line to accurately replace the shut-off valve. It will stop the water flow and save you from bathroom hazards. Plus, it allows you to work peacefully without thinking about the water flow.
Step 2: Stop The Supply Line Of The Toilet
Firstly, drain out the remaining water from the main supply line. It will stop the overflow from allowing you to work without any problems. But, you mustn’t stop here. You will also need to close the main supply line of the toilet.
You will see a hose that transfers the water from the toilet to the shut-off valve. You need to remove the hose by removing the bolts attached to the toilet. You can do it with an adjustable wrench with ease. However, before removing the hose, put an empty bucket underneath it to collect any remaining water and stop water flow on the bathroom floor.
Step 3: Remove the Existing Valve
The shut-off valve may have two types of connections. These are:
- Compression joints
- Sweated copper pipes
You need to use a crescent wrench for the compression joints to remove the bolts. Also, use a set of pliers to hold the main water line in its place. You can remove the shut-off valve when you have properly removed the bolts.
For the sweated copper pipes, you can quickly remove the existing valve. Then, look for debris and use a tube cutter to remove it. You need to cut through the metal valve to remove it. You should cut the pipe as much as possible to get the maximum room for the new installation.
Step 4: Install the New Shut Off Valve
Next up, you need to install the new shut-off valve. For this, connect a compression nut with the pipe. Then, connect the shut-off valve right with the compression ring. You may need to use a crescent or adjustable wrench to securely tighten the shut-off valve along with the compression nut.
When you install the new valve, ensure that its outlet face upwards. It is crucial since the outlet will connect with the main water supply line. Once you have attached and tightened the shut-off valve accurately, you need to connect it with the toilet. Then, attach the outlet with the main supply line with caution.
This is how you can replace the shut-off valve accurately and properly.
Fixing an Improper Shut Off Valve
When the shut-off valve doesn’t close properly, you can fix it. Actually, you will remove the stuck of the valve and allow it to shut off accurately. You may apply hot water to it to remove the debris and grime that might stop the valve from stopping.
For, this you need to loosen up the shut-off valve. You can wiggle the valve back and forth to loosen it quickly. At times it will allow the shut-off valve to work properly with a perfect closing. If this method fails, just pour hot water on the shut-off valve to loosen it. When you apply scalding water on the metal, it gets softened slightly and allows you to loosen the shut-off valve.
Last but not least, apply a WD40 lubricator on the shut-off valve if all these methods fail. The WD40 is a professional lubricator, so you can depend on its performance for sure.
Final Words
When the toilet shut-off valve won’t shut off accurately, you must act fast to avoid further damages and mishaps in your bathroom. Firstly, try to unclog the stuck shut-off valve with a commercial lubricating agent or scalding hot water.
If it fails and the valve is damaged, you need to replace it with a new one. Thankfully, you can easily complete the shut-off valve replacement without plumbing knowledge. So, it won’t cost you much either.
I am James Martin, An professional plumber with more than 16 years of experience. The main purpose of my writing is to share my experiences of helping others. Be with me and explore bathroom plumbing, installation, cleanness ideas, and many more.